Friday, May 18, 2012

Mother's Day Treat

Finally getting my DIY back on. I feel like it's been a while, but Mother's Day seemed like the perfect excuse to bust out the paint and get to work.

BTW...big announcement...I have officially been blogging for one year now. It's kind of crazy. My first post was on May 18th, 2011. I am so glad I have gotten to share our life with so many people.

Back to Mother's Day though. My mom had gotten Jay and I this cute orange and blue frame, looks a little weathered, for our anniversary. I just love it. I have no idea where she got it, so I decided to re-create it for Jay's mom.

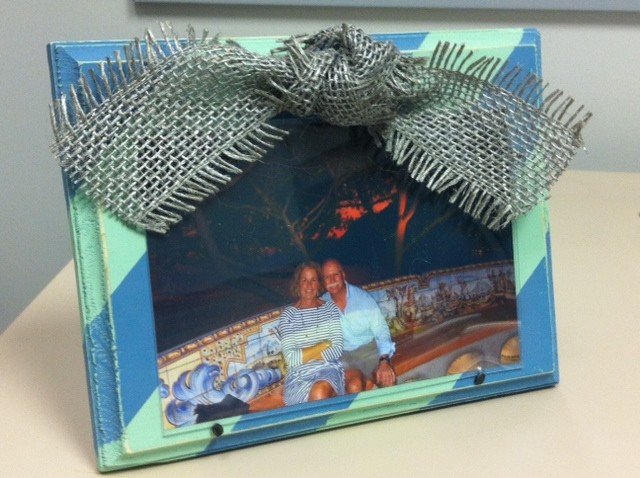
I used just a standard wood block and painted all over sea foam green first. After that was dried, I went back and taped off for the stripes. This part helped tremendously so pay attention. I painted all over sea foam green once more before I painted the blue. It definitely helped keep the blue from running under the tape.

Once the whole thing was dry, I took a sanding block to give it a bit of a distressed look. I found the ribbon at Michael's, and thought the grey worked well. I used a staple gun to keep it in place, next time I will use my glue gun. That was the initial plan this time, but I couldn't find it so we made do!


On the back, I simply drilled a small hole and placed a peg in there to keep it upright. 

This is a very simple project, if you are patient. Waiting for paint to dry is my toughest battle in life sometimes. I always just want to keep painting over it. I kind of like how this turned out, and want to try a couple of other variations.

I made one for Paige too, to take with her to Cape Town this summer. I didn't want her to forget what we looked like! However, since she ran out in such a rush, and spent less than a day at home between finals and Cape Town I didn't get a picture. Hers was red and black. It was the cutest frame I could make in red in black!

If you have any other suggestions, feel free to leave a comment!

Monday, May 14, 2012

When One Door Closes...

It's been a while. Yikes! Jay and I finally finished our front door. We spent most of last Sunday painting this door, and sitting in our over-heated living room for 8 hours waiting for it to dry. I have to say though, I really LOVE how it turned out. The door that was here in it's place before this little remodel was impossible. If you set your purse down, and water and did a little stretching before hand, you might be able to push it into submission so it would lock. Jay was better at this than I was, I typically just refused to use it unless absolutely necessary. So, being able to turn the lock on this one with one hand and a million things in the other is AMAZING! Besides the fact that it looks quite a bit nicer. The other door also had a huge small gap underneath of it. After a long Saturday for Big Gus changing the threshold to fill the 2" gap, it was fixed, for about 2 weeks. The neighbors cat could crawl through that hole. All in all, this door is a huge improvement when it comes to functionality, and it's also a huge improvement aesthetically. YAY!


This was right after the door was put in. We eventually had to paint everything that was white. And, can I tell you how funny it must have been to watch us get this thing out of the truck and into the garage. I'm not even sure how our contractor got it in there. They whole thing comes together in one piece.


This was Haley's idea of helpful. I'm pretty surprised she didn't get any paint on her. Although, I would probably never know!


Right after the paint was put on.


It's Georgia...it's hot...there are mosquitos. Sorry to my neighbors for having to look at this all day, but I was being eaten alive by those dang bugs all day. This had to happen!


Finally, the finished product. I just love how much it pops against the color of the house. 

If you are thinking about starting a project like this, whether you are getting a new front door, or painting the one you have, I have a couple of tips for you.

1) Paint is everything. We bought this Trim and Door Paint from Home Depot that worked like a charm. The guy in the paint department talked me into when I was painting the quarter round trim in our bathroom, and so I stuck with it again. On the front door, we only did one coat. One coat with black paint is virtually unheard of. It's made to be outside, and it is a gel consistency instead of a thin latex paint consistency. I thought it was a little expensive at $20 for a quart, but in the end it was worth every penny. You could see some of the brush strokes when I first put it on, but they evened out as it dried and now you can't see any of them. 

2) The brush is the second most important part of this project. Buy a good brush. It seems like a waste of money, but totally worth it. It will make sure the project looks professional.

3) When they say 8 hours on the can, they really mean it. Make sure you don't have anywhere to go that day, and get some plastic sheeting in case it starts to rain or the bugs are invading.

All in all, this was a fairly easy project. It wasn't the cheapest since there was a brand new door involved. But, if you are just looking for a new color on the door you already have this is a very cheap fix.